Two Calilfornia Banding Labs
posted by Bob Powell at
9/25/2009 05:53:00 PM
|
0 comments
![]()
One of the biggest challenges of my first year of birdwatching almost fifty years ago was separating young Forster's Terns from young Common Terns. And so it remains today. I find myself going back to the books every time I encounter one or the other. I had another opportunity to do just that yesterday (9 Oct 06) when I encountered 25 juvenile/first winter Forster's Terns on the beach at Caesar Creek State Park. (Directions)
I can state without equivocation that these birds were Forster's and not Common because they were quite vocal and the two species are easily distinguished by call. But looking at birds I knew to be Forster's Terns, I nevertheless experienced some confusion about several ID points. So I whipped out my trusty Panasonic Lumix DMC-FZ50 and fired off about 200 pictures. Here are the most instructive. Click on the picture or on the link for a bigger view.
 Juvenal (foreground) and first winter Forster's Terns
As far I was could see all 25 of the observed birds fell between the two extremes shown above. The bird in the foreground is still substantially in juvenal plumage. Truly juvenal birds would show a gingery fringe to most of the mantel feathers, scapulars and wing coverts and a dark brown cap. The fringes are all gone now and most of the back shows newly molted gray feathers. The tertials are very dark and there are still some dark-centered median coverts. The head is in the process of losing the dark feathers of forehead, crown and nape. The structure of "mask" is already evident.
The bird in the background looks very much like a basic plumaged adult, but the nape of the neck usually retains some of the darker feathers of the juvenal plumage. (The nape of the basic plumaged adult is pretty much pure white.) The flight pattern shows differences, as well, as shown in some of the pictures below.
 Advance of head molt
This collection of birds shows the range of head markings present at this date. The bird numbered "1" still shows substantially the head markings of the juvenal plumage, whereas, bird "2" shows an almost completely white forehead, crown and nape, give the masked pattern which many birders use as a diagnostic indication of Forster's Tern. The partial hood of the birds in the earlier molt stage could easily lead to confusion with basic plumaged Common Tern.
 "Carpal bars?"
Common Terns reliably show a carpal bar in all plumages except alternate. The photos above show that in juvenile/first winter plumage the Forster's Tern shows some dark scapulars that might be mistaken for a carpal bar. The carpal bar of the Common Tern is due to dark coverts in the patagial area and has a different look.
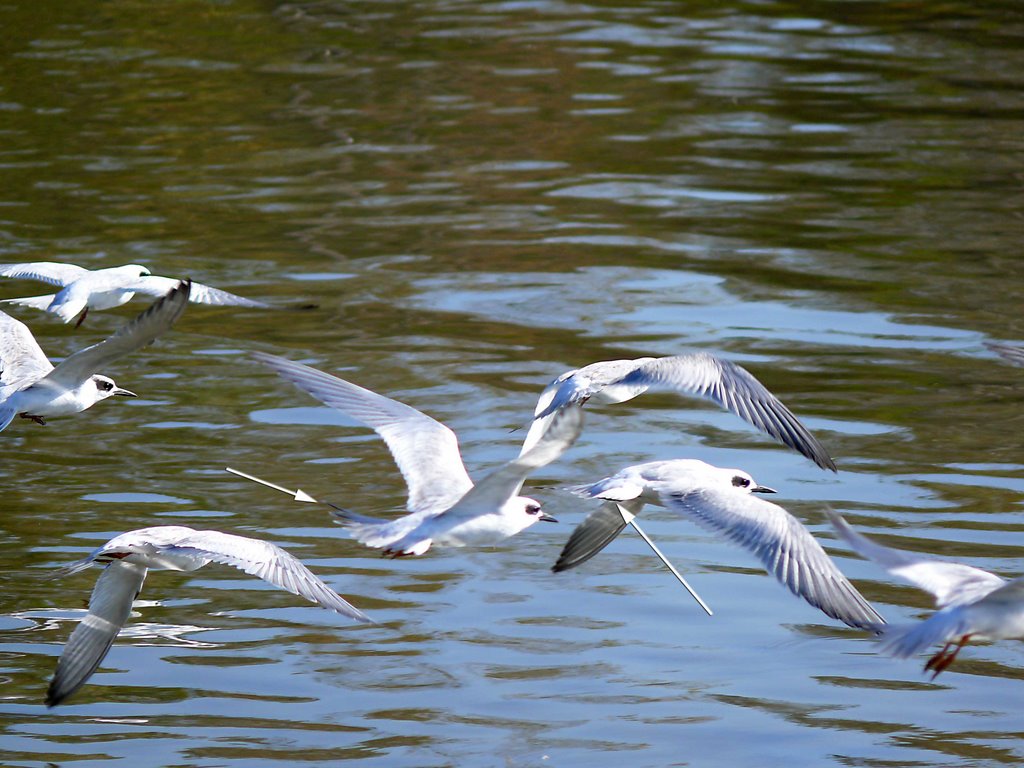 Flight patterns of first winter Forster's Terns
First winter Forster's Terns in flight. The light-colored primaries are similar to those of the adults, but it must be noted that the wings of the first winter Common Tern lack the dark wedges that characterize the adults. This nullifies one of the best ways of separating adult Forster's and Common Terns. However, the first year Forster's lacks the dark carpal bar and the dark gray secondaries of the Common Tern
The tail is also subtly different. Note the dark markings on the inner webs of the outer two or three rectices. The detail below shows this a little more clearly. Common Tern shows a dark outer web on the outer tail feathers only. This is a significant difference, but one that is hard to spot in the field.
 Detail of tail markings of first winter Forster's Tern
posted by Bob Powell at
10/10/2006 11:53:00 AM
|
1 comments
![]()
This morning (Saturday, 30 Sep 06) there were still two Franklin's Gulls on the beach at Caesar Creek State Park (Directions here). One was apparently the molting adult photographed earlier in the week by Rick Asamoto. The other was a juvenile very early in the molt to first basic plumage. Fortunately, the sun came out and I was able to get some pictures.

Adult Franklin's Gull, beginning to lose the black hood as it molts into basic plumage. Note red tip to end of delicate bill. There is a faint, but clearly discernible pinkish bloom visible on belly, which apparently is present in some breeding birds.

Franklin's Gull in first winter plumage. Gray mantle overlapping brown coverts and flight feathers.
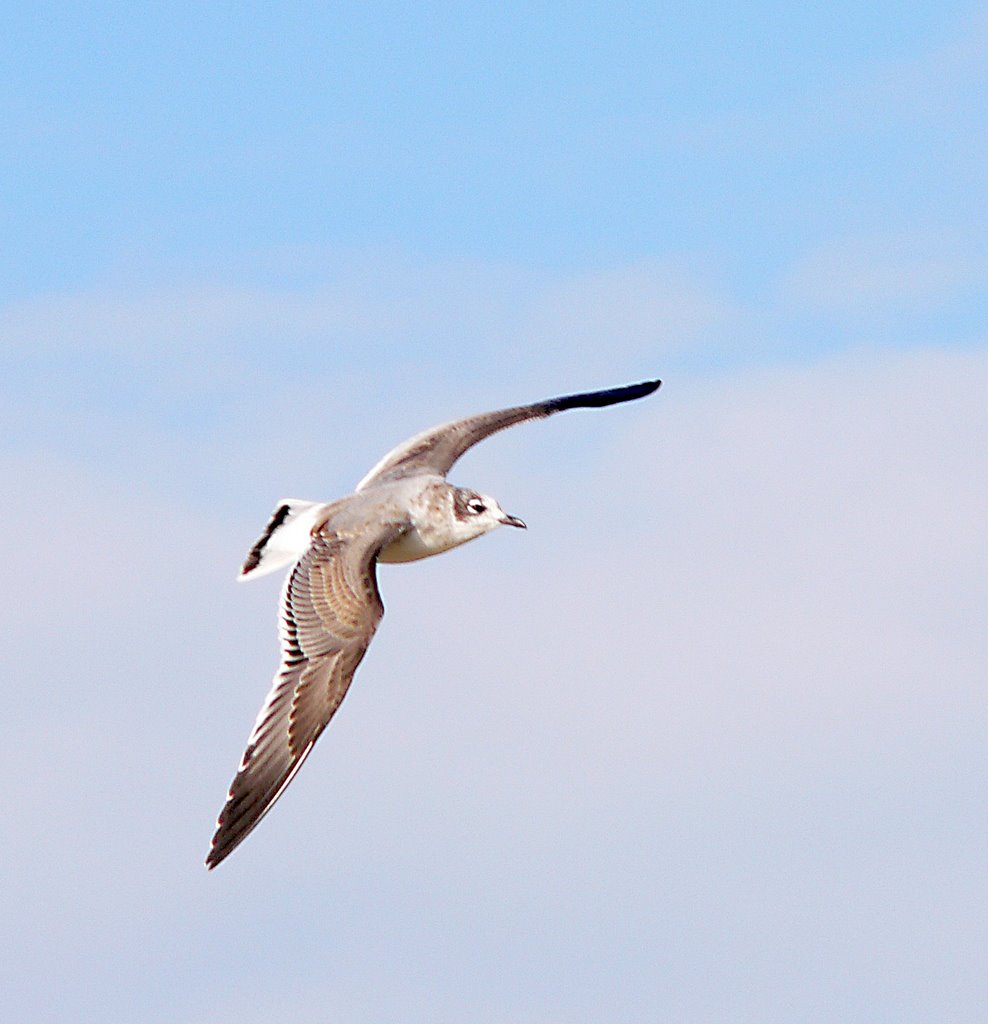
First winter Franklin's Gull in flight. The two outer tail feathers are pure white, leaving the black tail band incomplete. In Laughing Gull, the band goes completely across the end of the tail.
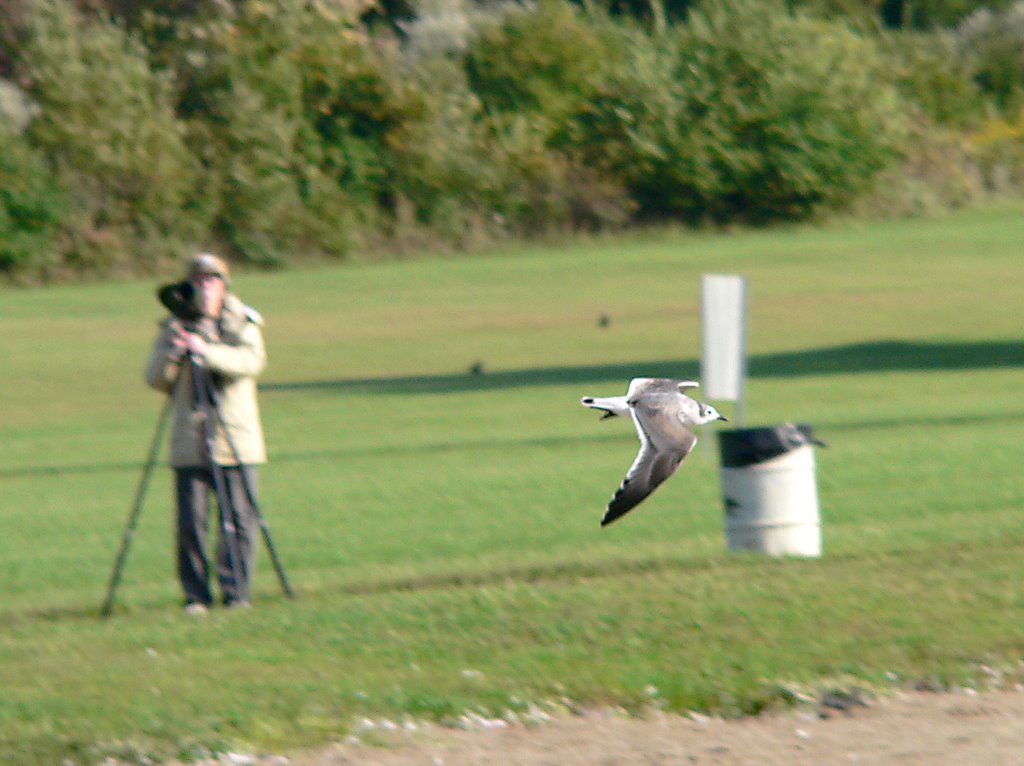
First winter Franklin's Gull zips past a watchful Larry Gara. Eric Baumgardner was also present.
posted by Bob Powell at
9/30/2006 05:59:00 PM
|
0 comments
![]()
Larry Gara found a large juvenile gull at the beach at Caesar Creek State Park several days ago. (The Caesar Creek State Park beach is located in Warren County, Ohio, Delorme p. 65, D7) The immediate suspicion was that it was a Great Black-backed Gull. Larry's sighting aroused a good deal of interest because this would be a first for Caesar Creek.
The bird was back today Tuesday, 26 Sep)and was closely observed by a whole squad of competent birdwatchers (Larry, Rick Asamoto, Frank Fricke, Beth Mitchell, and your humble reporter). Compared to the Ring-billed Gulls that it was in with, it looked, in Beth's words, "like a moose." There were also three Herring Gulls reasonably nearby and the juvenile was significantly larger.
The most striking aspect of the bird was its enormous black bill, black all the way to the base. The head was very light except for much darker feathering around and behind the eye. The mantle feathers, scapulars and wing coverts were darker than we are used to seeing in juvenile Herring Gulls and were set off more contrastingly with the large white fringes. Overall, the back of the bird had a crisp, checkered appearance.
In flight, the rump contrasted strongly with the dark back. It appeared to be white with small, dark brown vermiculations. The tail showed a sharpish black terminal band. The wing feathers, both primaries and secondaries were dark brown with little variation along the length of the wing.
Taking all this into consideration, it is our opinion that the bird was indeed a Great Black-backed Gull, apparently still in juvenile plumage. At least three of the attendent birders have considerable experience with this species on Lake Erie and the Atlantic coast.
Numerous photos were taken by Frank, Rick and me. Here are three of the most instructive of mine.

Juvenile Great Black-backed Gull surrounded by Ring-billed Gulls, showing its great size. The bill is huge. Note that the GBGU is resting on its tarsi.

Great Black-backed Gull taking off from the beach, showing dark flight feathers, contrasting undertail coverts, and well-defined dark tail band.

A poor shot, taken as the bird passed directly up-sun, but it is the best view I have of the upper side of the tail. The mostly white coverts form one of the better field marks differentiating the juvenile Great Black-back from the juvenile Herring Gull.
posted by Bob Powell at
9/26/2006 12:48:00 PM
|
0 comments
![]()
Buying a pair of binoculars There are lots of reviews of binoculars on the web. In addition, Birding magazine runs reviews about once a year. My rule of thumb is very simple:
I went through about six pairs of progressively more expensive binoculars while learning this lesson. I pass it on to you for free.
In my experience, the threshold of utility for a pair of binoculars is about $350 (in 2006 dollars). At this level, one begins to encounter binoculars with very nice optics and reasonably sturdy construction made by reputable firms with reasonable warranties and effective support capability. If something goes wrong, you can get it fixed. There are nevertheless two points that you will want to satisfy yourself on which vary widely among optics at this level. These are eye relief and close focusing.
Eye relief is important for eyeglass wearers, who need long eye relief (big number) because they are essentially holding the binoculars further away from their eyes. If you wear eyeglasses, don't try to use the binoculars without them. It just gets to be too much of a hassle. I know because I resisted it for years after age drove me to reading glasses. It doesn't take much effort to learn to use eyeglasses and binoculars together. You should do it.
Close focusing is pretty much self-explanatory. If you are lucky enough (or skillful enough) to get into close quarters with a small bird, you want to be able to take maximum advantage of the experience. It doesn't seem like much, but having to take a step or two back from a good bird is really galling. I would like to be able to focus on my toes. Unfortunately, my Leicas won't do that, but that is what I would like.
When you get up to the $1000 level, the optics are so superb that I cannot distinguish any differnece among them. At this level, any binocular will give you light, bright, colorful images that snap into focus. And those superb optics come in a chassis you can practically drive nails with. At this level, you can confidently expect that your binoculars will outlive you. If you can stretch your budget to one of these wonderful instruments, do it. The only criterion you need consider is personal comfort. Pick the one that feels best to you, sits in your hands nicely, comes readily to your eyes, and complements your personal style.
How much power? Binocular manufacturers use two numbers to characterize their models. The first one is the power. This is the amount of magnification. This is a linear scale: a binocular with twice the power makes the image look twice as big. The other number in the specification is the diameter of the objective lens (the one closest to the bird). Thus a 10 x 42 binocular is ten power with a 42 mm objective lens. The significance of the objective lens is its light-gathering power. A bigger objective gathers more light and generally gives a brighter, more pleasing image. Note that the ability to gather light is a function of the area of the lens, and is thus proportional to the square of the diameter of the lens. Simply put, a lens with twice as big a diameter with gather four times as much light. So even a small difference in the size of the objective is significant.
There are two basic designs of binoculars, porro prism and roof prism. Porro prism binoculars are the kind that you see submarine skippers using in old WWII movies. Roof prism binoculars look like two telescopes lashed together. Today, there is little point in going for porro prism binoculars. The roof prism design contains fewer elements, has fewer internal reflections (where light is lost), and weighs less.
The old rule of thumb for porro prism binoculars was that the objective diameter should be five times the power. Thus, the popular sizes were 6 x 30, 7 x 35, and 8 x 40. There were some 10 x 50s around, but they were so heavy that few could hold them steady. Roof prism designs are more efficient, so you can combine higher power with a smaller objective and still get superior image quality. The two dominant design points these days are 8 x 42 and 10 x 42. It sounds contradictory, but it's not, really. Both designs have strengths that play to different types of birding.
The 8 x 42s are lighter, easier to point, and have a very bright image. They come into their own in close quarters, under closed canopies, or when chasing small agile birds. The 10 x 42s are preferred by birders who are particularly interested in waterfowl, shorebirds, gulls and terns, hawks, seabirds, and birds of the open spaces: savannahs, grasslands, deserts and salt marshes. In these environments, the narrower field of view is not a problem and the ambient light levels are usually high enough to give a plenty bright picture.
So it comes down to a matter of what kind of birding you do and how much you can spend. Isn't that true of life in general?
posted by Bob Powell at
6/19/2006 07:47:00 PM
|
0 comments
![]()
A beginning birder recently asked my advice on which field guide to invest in. Here is a list of the more popular choices, in terms of what you see in bookstores, together with my ten-cent reviews.
1. The Audubon guides. You'd think that the National Audubon Society would put out the definitive field guide, but alas that is not the case. The fatal flaw is the use of photographs instead of paintings. The result is you get one view of one bird at one stage of its life. Furthermore, in order to get photos, it is often necessary to shoot the birds in positions and postures where they are not usually found in the field. For instance, the swallow pictures are all taken at the nest or perched on a wire, whereas in the field they are far more often encountered on the wing, where the identification problems are entirely different. A clever artist can convey a great deal more information by synthesizing impressions from manyexperiences. Also, the text in the NAS guides is much too skimpy to be useful in any but the most obvious identifications. In short, this is my least favorite guide.
2. The Stokes guides. Very popular and written for popular tastes, but not authoritative in any way. Illustrations leave a lot to be desired and the text is way too simplistic.
3. The Golden Guide (I think it is called something else now). It was very innovative 40 years ago. It was the first guide to put the illustrations and the text on facing pages, and Arthur Singer's illustrations were very fresh. Sadly, it has not kept pace and is rarely used by serious birders today.
4. The Peterson guides. Written by the dean of American bird-watching, the guy that invented the field guide in 1936. In his later years, however, Peterson fell behind the tremendous advances in the state of the art advances that he had put in motion to begin with. Peterson died in 1996. A new edition of Peterson's eastern guide was published in 2002, but in my view, the revisions were not sufficient to restore the authority of the earlier editions. Nevertheless, I think they are still worth a mention for two reasons. First, the illustrations are superb. In just about every instance, they capture the essence of the living bird like no others. Second, Peterson's guides come in two flavors, east and west. By starting with just the Eastern birds, you will spend a lot less time barking up wrong trees. Moreover, Peterson's guides are still small enough to carry in a back pocket, and that is not a trivial advantage.
5. The Kaufman guide. The Kaufman guide is focused on the beginning birder. It is written by a birder of unrivalled credentials. The text is very good, maybe the best of the lot. However, the illustrations are basically photos that have been heavily processed in Photoshop. It is an interesting idea, but in my view not very successful. It does not seem to have caught on among serious birders, but it is certainly worth a critical look. It may have charms for the beginning birder that are not apparent to those of us brought up on other books.
6. The National Geographic guide. Until recently, the Nat Geo guide was the US standard. It is still an excellent choice for birders of all levels. It illustrates every species that regularly occurs north of the Mexican border and almost all the well-differentiated subspecies, as well as juvenile and intermediate plumages, color morphs, etc. However, for the beginning birder such profusion often results in sensory overload. I can't tell you the number of beginning birders who have decided that a strange bird in their backyard was a Pyrrhuloxia when it was a female Cardinal all along. If you haven't got the picture of the Pyrrhuloxia, a bird of the southwestern deserts, in your book, you are not likely to bite on it.
The other reservation about the Nat Geo guide is that it is written and illustrated by committees. The contributors are generally well-qualified, but it does lead to a certain unevenness from one section to another. This is particularly true of the illustrations.
7. The Sibley guides. David Sibley is a terrific artist and this is thus largely a visual guide. It is chock full of illustrations of birds perched, flying, feeding, doing just about everything birds do. The text is somewhat skimpy, though accurate. The main deficiencies of the text is that there is little habitat information and the vocalizations are rendered poorly. Furthermore, one must realize that Sibley's illustration technique is highly stylized, particularly the colors. He is obviously going for a schematic effect; he wants to conjure up the impression of the bird, rather than rendering a feather-by-feather portrait.
It is interesting to me that in Peterson's first couple of editions, he did something similar. For instance, he did all the ducks in blocks of black and white on the theory that when one sees ducks at a distance in the winter, the light is not usually very good and that washes out the color. His aim was verisimilitude in the experience, rather than in the bird. As time went on, these illustrations were replaced by full color depictions of the ducks at close range in good light. I suspect that Peterson just could not resist the clamor of his public for more of his superb art. The same fate may eventually overtake Sibley.
The standard Sibley guide contains all the birds that the Nat Geo guide does and is so large that it is hard to use in the field. Some say that this is a good thing because it teaches the student to make careful observations and THEN consult the field guide. I tend to agree with this, but few have the patience to do it. A middle way, perhaps, is afforded by the fact the Sibley's also comes in an eastern and a western edition. These are much easier to carry, certainly no more difficult than the Nat Geo guide.
Sibley also has out a beginner's guide to birding. This is not a field guide, but a collection of field birding lore, something the beginning birder will probably be interested in. He has also published a much bigger book on bird life and behavior, a sort of guide to ornithology for birdwatchers. I think sooner or later, you will want that book or something like it in your library.
State field guides are becoming increasingly available and these can be a real boon for the beginning birder. Jim McCormick's book on the birds of Ohio is a good example. The illustrations are nice, but are not so plentiful as to allow one to dispense with a field guide. The text is very good and is pointedly specialized to Ohio. There is also an excellent map for each species and a bar chart time line that makes it clear where and when the bird is to be expected in Ohio and in what relative numbers. This is a tremendous help to those with little experience in the state and to beginners, as well.
So, what is my answer to your question? Hard to say, because at some point it becomes a matter of taste. You may even come around to the approach I (and many others, I suspect) have taken: buy 'em all. Sooner or later, you will come across a problem that one of them treats better than the others.
posted by Bob Powell at
6/13/2006 04:35:00 PM
|
0 comments
![]()
I lived in Britain for three years in the late 70s when jizz birding was rapidly gaining adherents. In most cases, I thought (and still think, to a large extent) that invoking jizz was a indication that the observer was either too inarticulate or too lazy to say what he or she really meant. It was sort of like distinguishing the yellowlegs by saying that the greater has "a bigger beak." Bigger than what? In the absence of a lesser yellowlegs to compare it with, the observation lacks persuasiveness. On the other hand, observing that "the bill was slightly longer than the head and slightly upturned" is much more useful statement, and one that few of us would argue with.
On a deeper level, "jizz" is a function of the basic human pattern recognition ability. A great deal of the human brain is highly specialized for this function. We are incomparably better than computers at recognizing patterns. And the more often we encounter the pattern, the better we get at recognizing it. For instance, if I see Bill Whan across the room at a meeting, I recognize him immediately, even if he is dressed differently, turned in a different direction, sitting or standing, wearing a hat or not, etc. I suppose you could say I identify him by his jizz. If I can do it with Bill Whan, is it not equally acceptable to identify birds the same way?
The short answer is "yes." The long answer is that it depends on how well your pattern recognizer is trained. We can all identify robins in a wide variety of circumstances because our pattern recognizer has such an abundance of experience with robins. If we turn to dowitchers, however, the situation is much different. I have been struggling with dowitchers for 40 years. Last year at the shorebird symposium, someone told me about the "swallowed a grapefruit" tip. The next day at Cedar Point, we found a nice stretch of shallow water that held a bunch of really instructive birds. In particular, there were several small groups of dowitchers of both species, and the "swallowed a grapefruit" effect was very evident; distinctive, even.
However, back home, where we experience dowitchers in onesies and twosies (if at all), the "swallowed a grapefruit" effect is not nearly as easy to use, owing to the lack of comparison. Now, if I were in a situation where I encountered both species of dowitchers daily, I would probably become much more confident in using that comparatively elusive element of the dowitcher morphology.
In my experience, pattern recognition skill often has a fairly short shelf life. I have been to Hawk Mountain several times. Each time, I come away able to distinguish Cooper's and sharp-shinned hawks at a range of two miles. However, after a fairly short time back home, I find myself as puzzled by accipiters as I ever was. The confidence I had developed in a day of intensive pattern recognition training has faded with time.
And that is what makes my wary of endorsing "birding by impression." The variation of pattern recognition skills across observers and through time means the assertion of an identification on the basis of an "impression" must be viewed with a certain degree of skepticism unless the observer has a widely accepted reputation for accuracy in such circumstances. For the rest of us, we should be prepared to present a bunch of corroborating details.
posted by Bob Powell at
6/13/2006 11:48:00 AM
|
0 comments
![]()
A journal of birds, birding and birders from the perspective of one who has been at it for almost 50 years. Watch for new articles every week.
